Build and design a form
Add fields, set validation and mapping, organize pages, apply themes, customize the design, and configure the after-submit experience.
The form editor opens fullscreen. The left sidebar holds Form settings tabs; the center/right is a live Preview you can switch between desktop, tablet, and mobile.
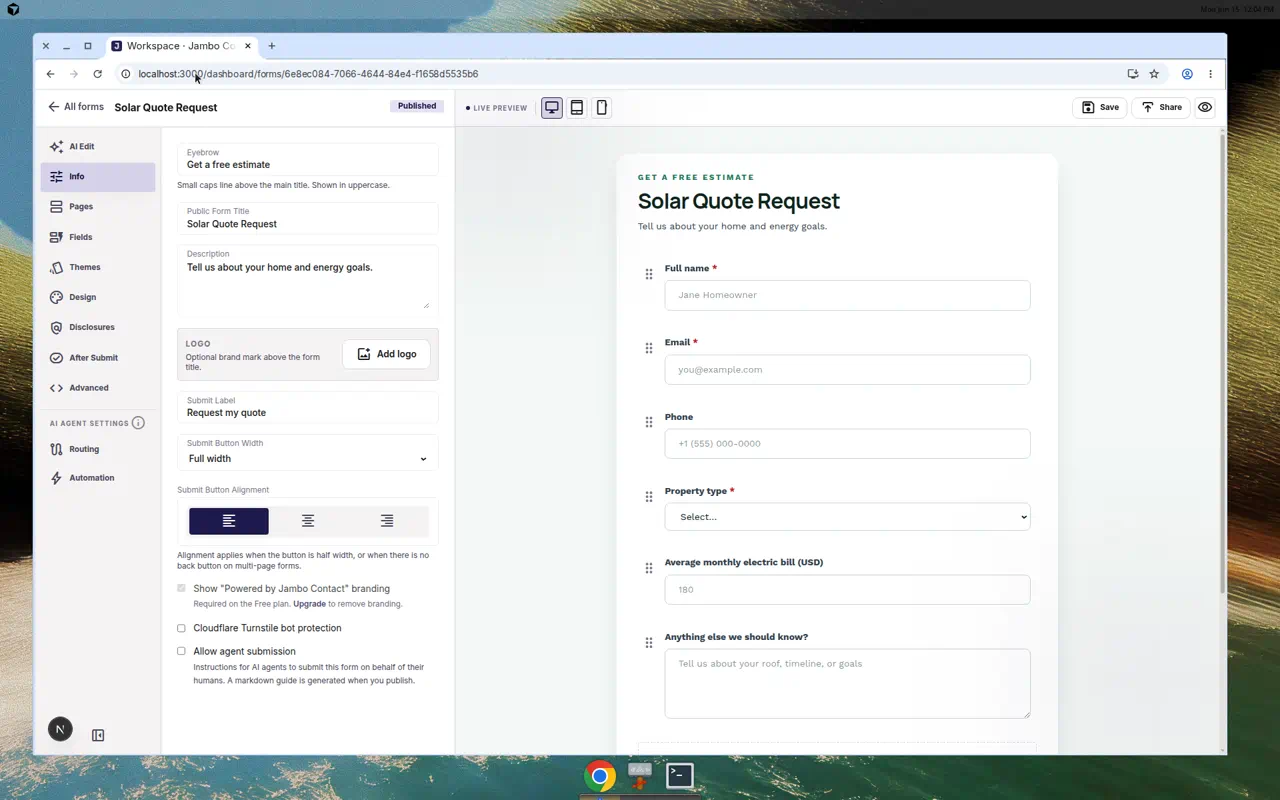
The editor layout
- Top bar: an "All forms" back link (warns about unsaved changes), the editable internal form name, and status badges (Published/Draft, Needs Work, Unsaved). On mobile, use the Editor / Preview tabs.
- Preview toolbar: device size icons, Save (draft), Publish / Share, and Test & preview.
Form settings tabs
| Tab | Purpose |
|---|---|
| AI Edit | Revise the whole form by chatting in plain language; restore earlier revisions. |
| Info | Eyebrow, public title, description, logo, submit label, branding, bot protection, agent submission. |
| Pages | Split the form into multiple pages and assign fields to each. |
| Fields | The field palette — add and search field types. |
| Themes | Apply a preset visual theme. |
| Design | Fine-tune typography, fonts, colors, and corner radius. |
| Disclosures | Privacy/consent copy shown on the form. |
| After Submit | What happens after someone submits. |
| Advanced | Custom CSS / raw JSON spec. |
Add and configure fields
- Open the Fields tab and search with Search fields….
- Click or drag a field onto the preview canvas. Drag to reorder; toggle half/full width.
- Click a field to open the field inspector, where you set:
- Label, key, placeholder, required, and width
- Mapping target — where the value goes (e.g. Contact → Email, Lead → Summary, or a custom field)
- Options (for dropdowns, radios, and checkbox groups)
- Validation rules
Available field types include standard contact fields — First Name, Last Name, Full Name, Email, Phone, Company, Job Title, Message — and custom inputs: Short Text, Long Text, Number, Dropdown, Radio, Checkbox, Checkbox Group, Date, File Upload, and Signature.
Mapping at least an Email field to Contact → Email is what lets the agent send a first-touch reply. Without an email, routing actions that send email are skipped.
(screenshot or media)Field inspector showing label, mapping target, and validation options
Branding and intro (Info tab)
Set the Eyebrow, Public Form Title, Description, logo, and Submit Label. You can also:
- Toggle Show "Powered by Jambo Contact" branding (removing it may require a paid plan).
- Enable Cloudflare Turnstile bot protection to reduce spam.
- Enable Allow agent submission if you want the AI agent to be able to submit this form on a contact's behalf.
Themes and design
- Themes applies a complete preset look in one click.
- Design exposes typography sliders (heading size, eyebrow size, label size, etc.), font family, color groups (Canvas, Typography, Fields, Button), and corner radius.
Multi-page forms (Pages tab)
Add pages, rename them, reorder them, and assign fields to each page. Long intake forms convert better when split into shorter steps.
After-submit experience
In the After Submit tab choose either:
- Show a thank-you message on this page — set the Thank-you heading and Thank-you message, or
- Redirect visitors to another URL — set the Redirect URL and Redirect timing (immediately, or after 1–3 seconds).
Saving
Click Save to store a draft. For a live (published) form, saving updates the live version and shows "Changes saved — live form updated". Use Test & preview to submit test entries without affecting analytics.
When the form is ready, continue to Publish & embed a form.
More in Forms